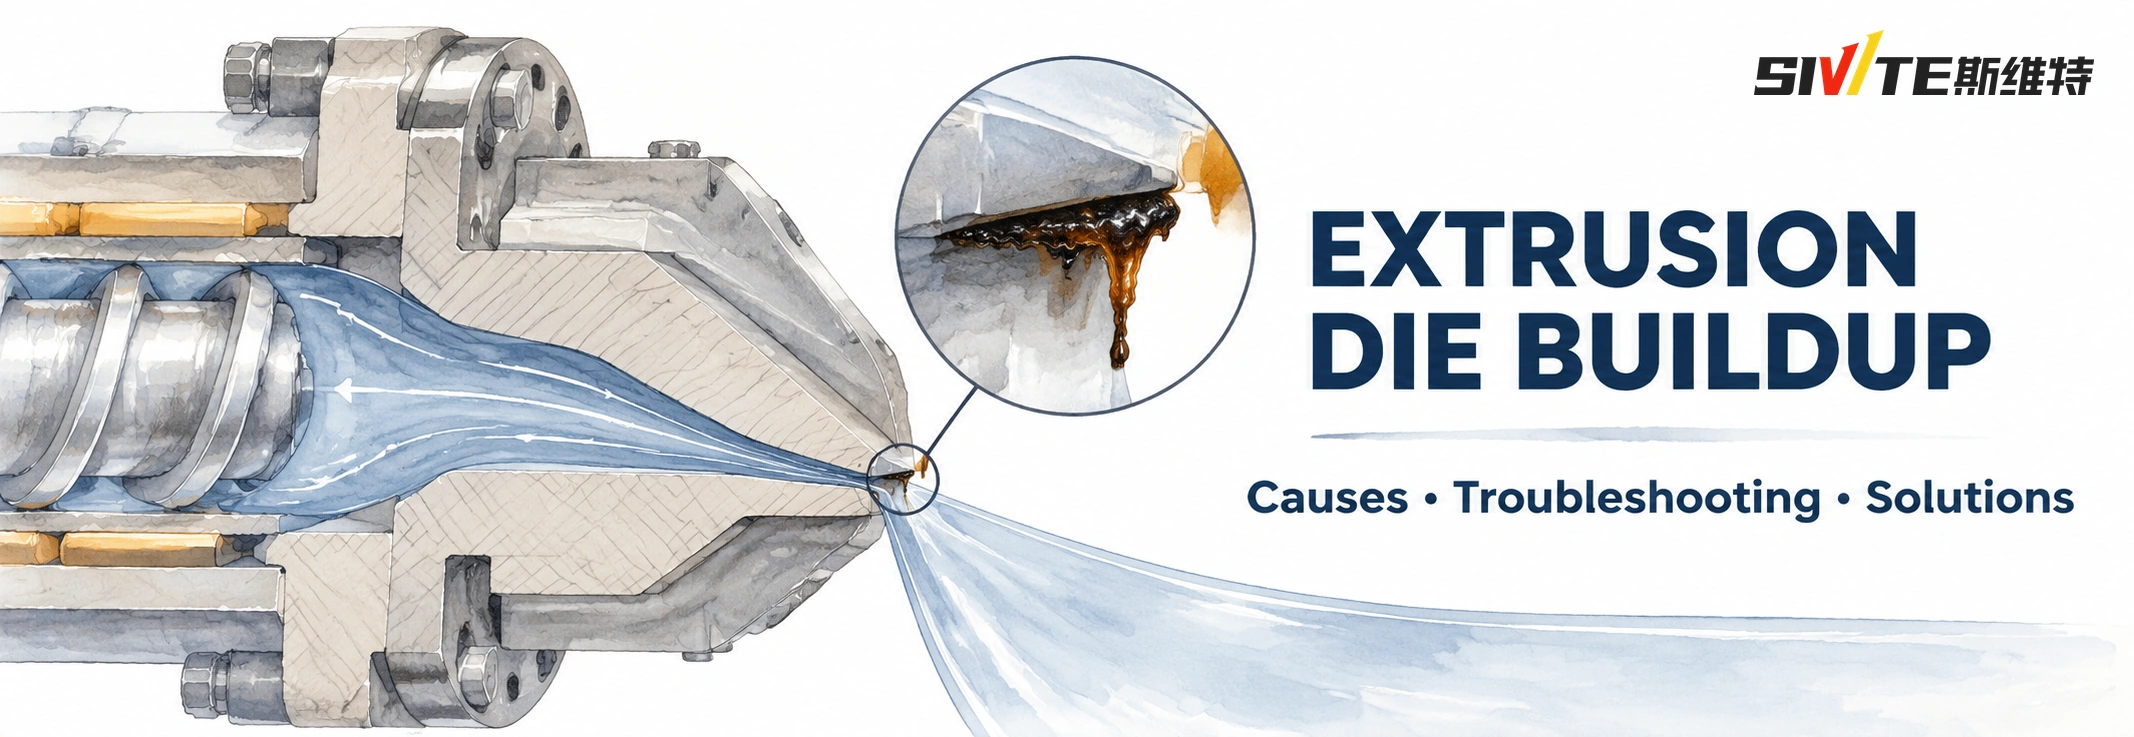
If you work with plastic extrusion or blown film production, you have probably encountered extrusion die buildup, commonly known as die drool or die lip buildup.
After several hours of apparently stable operation, a dark, sticky deposit may gradually accumulate around the die lip, forming a residue that looks like a string of burnt material hanging from the die opening.
Even a small amount of buildup can cause matte streaks, surface scratches, blown-film bubble instability, stringing, and extrusion profile defects. Operators often have to stop and scrape the die lip, only to find the deposits returning a few hours later.
Many operators initially blame excessive temperature or too many low-molecular-weight components in the resin. Both can contribute, but die buildup is usually more complicated. It involves the interaction of melt rheology, die geometry, formulation, processing conditions, and material consistency.
Quick answer: What causes extrusion die buildup?
Extrusion die buildup is generally associated with degraded polymer, migrated lubricants or additives, low-molecular-weight oligomers, and material trapped in mechanical dead zones. The most effective troubleshooting approach is to inspect the die, review the formulation, check shear rate and temperature settings, and examine the raw material and devolatilization conditions.
1. How Does Extrusion Die Buildup Form?
Die buildup can contain a mixture of different substances, including:
- Thermally degraded polymer.
- Separated lubricants and antioxidant residues.
- Low-molecular-weight oligomers.
- Calcium carbonate (CaCO₃) or pigment particles.
Inside the die, the polymer melt is under high pressure. The material close to the metal wall experiences particularly high shear.
When the melt exits the die, the external confinement suddenly decreases. Polymer chains begin to recover elastically, producing a phenomenon known as die swell.
When wall shear stress becomes excessive, the near-wall layer may slip relative to the main melt flow. Low-molecular-weight components, lubricants, and other additives can migrate toward the outer die lip and stagnant areas.
Once exposed to oxygen and high temperatures, these deposits may undergo thermo-oxidative degradation. As the material continues to accumulate and degrade, it can become dark, sticky, and eventually carbonized.
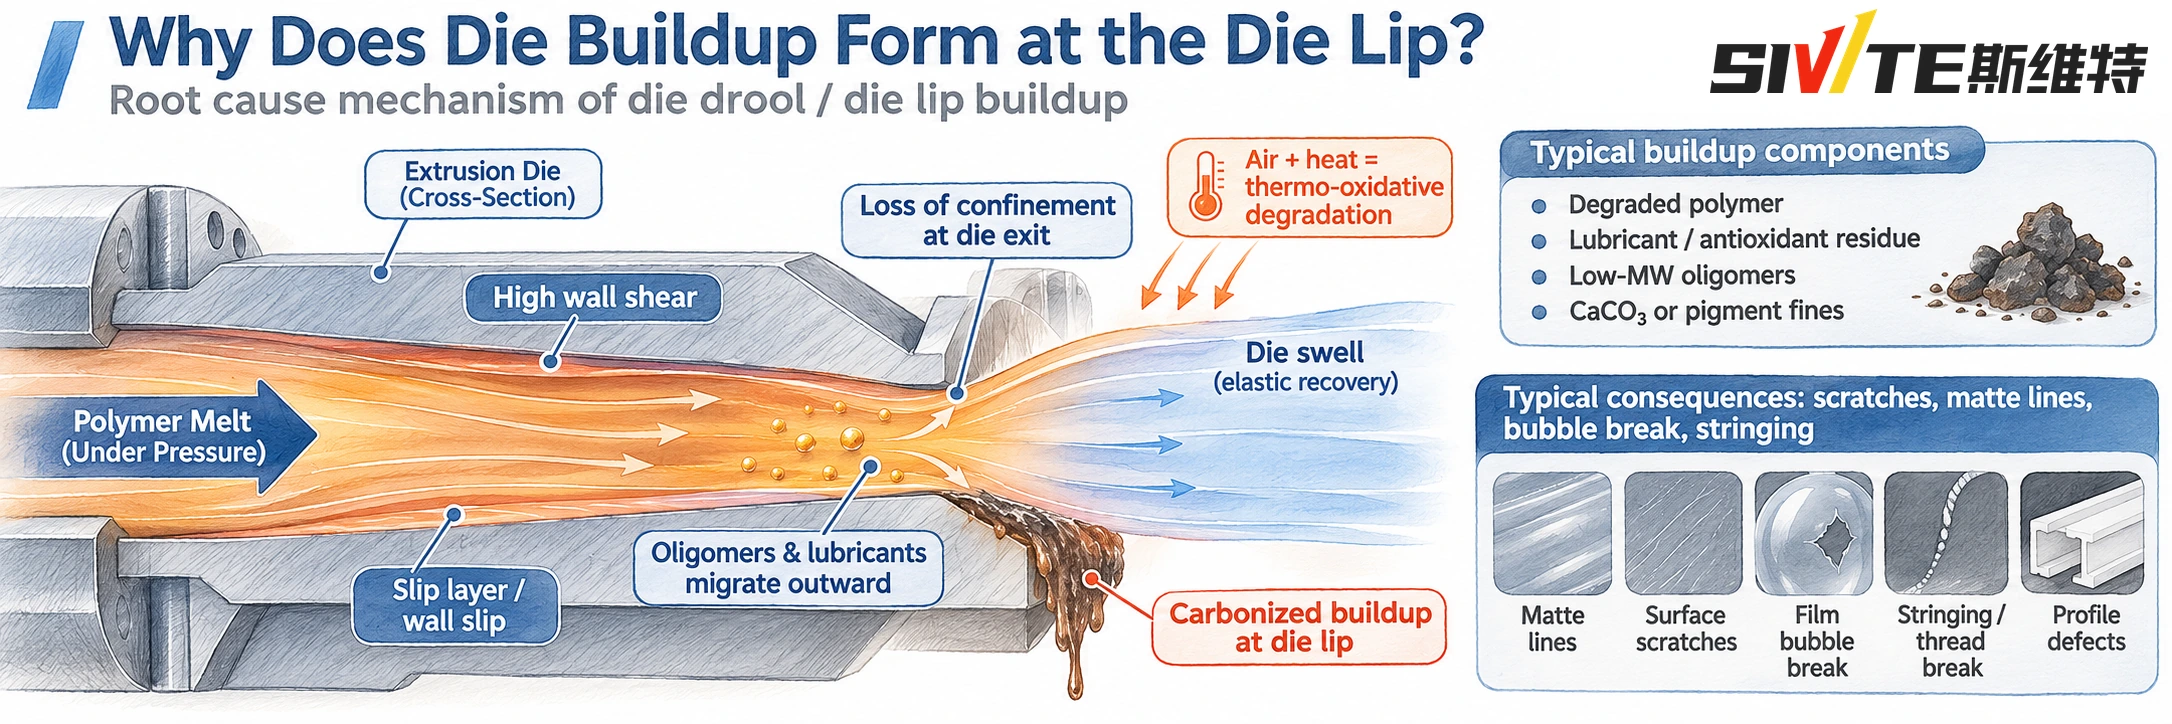
Cross-sectional illustration showing polymer melt flow, wall shear, die swell, component migration, and carbonized deposits at the die lip.
2. Four-Step On-Site Troubleshooting for Die Buildup
Instead of changing several process parameters at once, follow these four steps to identify the actual source of the problem.
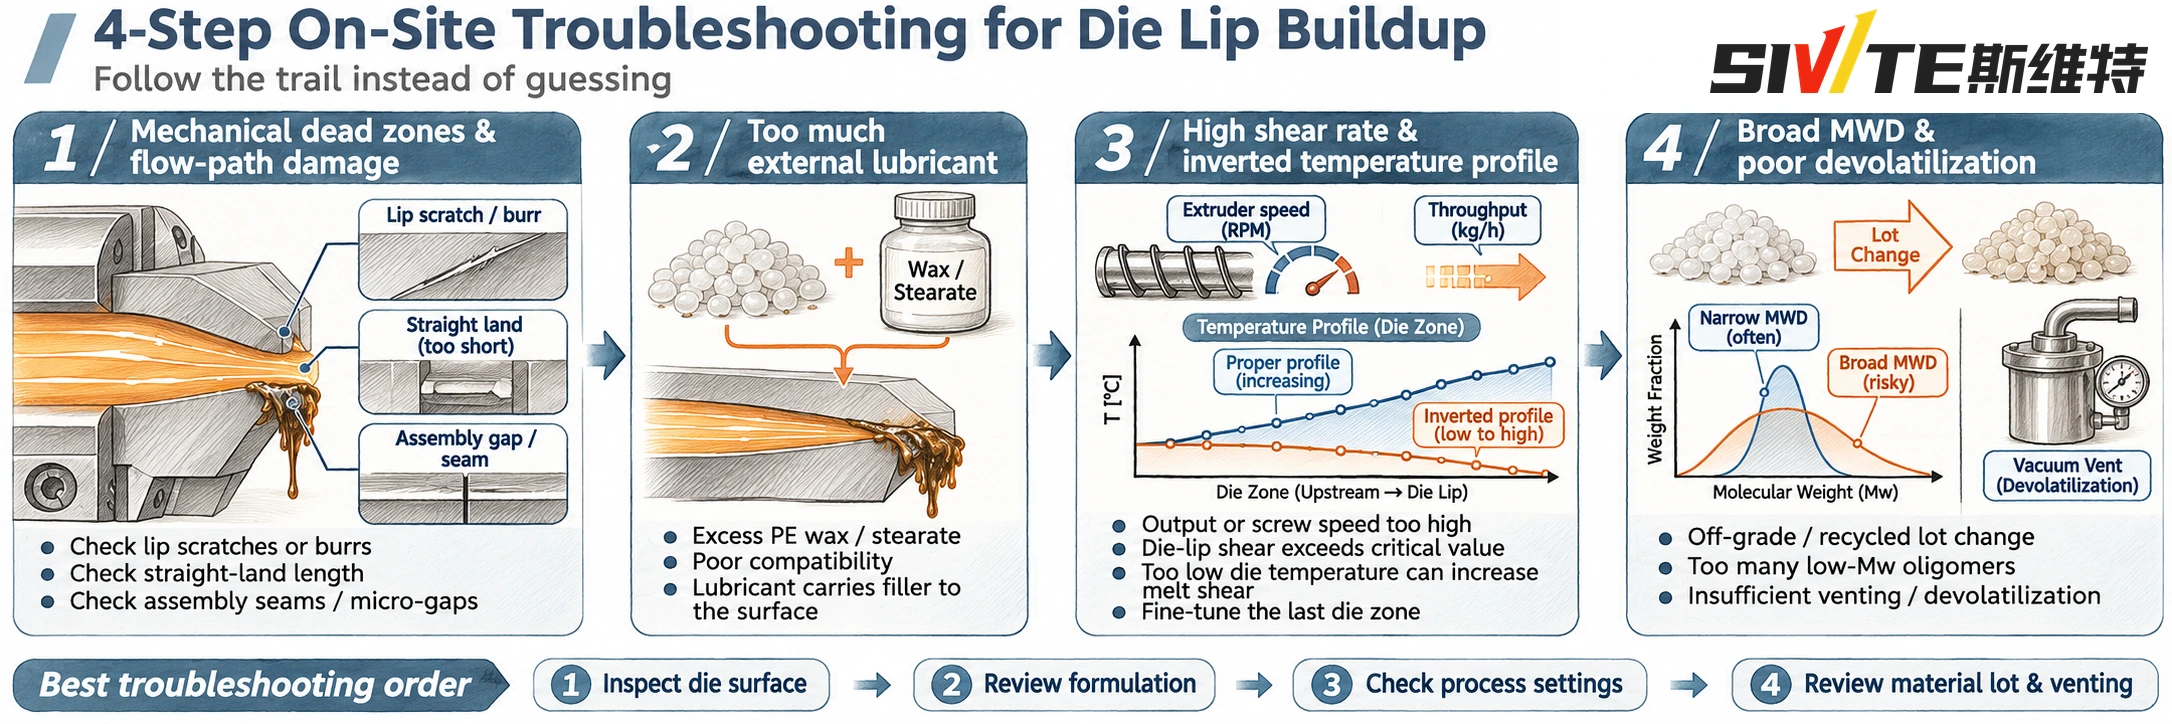
Step 1: Inspect Mechanical Dead Zones and Flow-Path Damage
Mechanical defects around the die lip can create local flow disturbances and provide locations where degraded material accumulates.
Check the following areas:
1. Scratches and burrs on the die lip
Scratches, burrs, or small edge defects left by improper cleaning tools can disturb melt flow. Local micro-vortices may develop around these defects, creating starting points for buildup.
2. Insufficient die land length
If the straight land section is too short, or the flow channel has an excessive compression ratio, the melt may not have enough distance to relax before leaving the die.
This can increase surface instability and contribute to material accumulation.
3. Assembly seams and micro-gaps
Small gaps between die components can trap residual polymer. Over time, the trapped material may degrade and carbonize, eventually leaking out and forming deposits around the die lip.
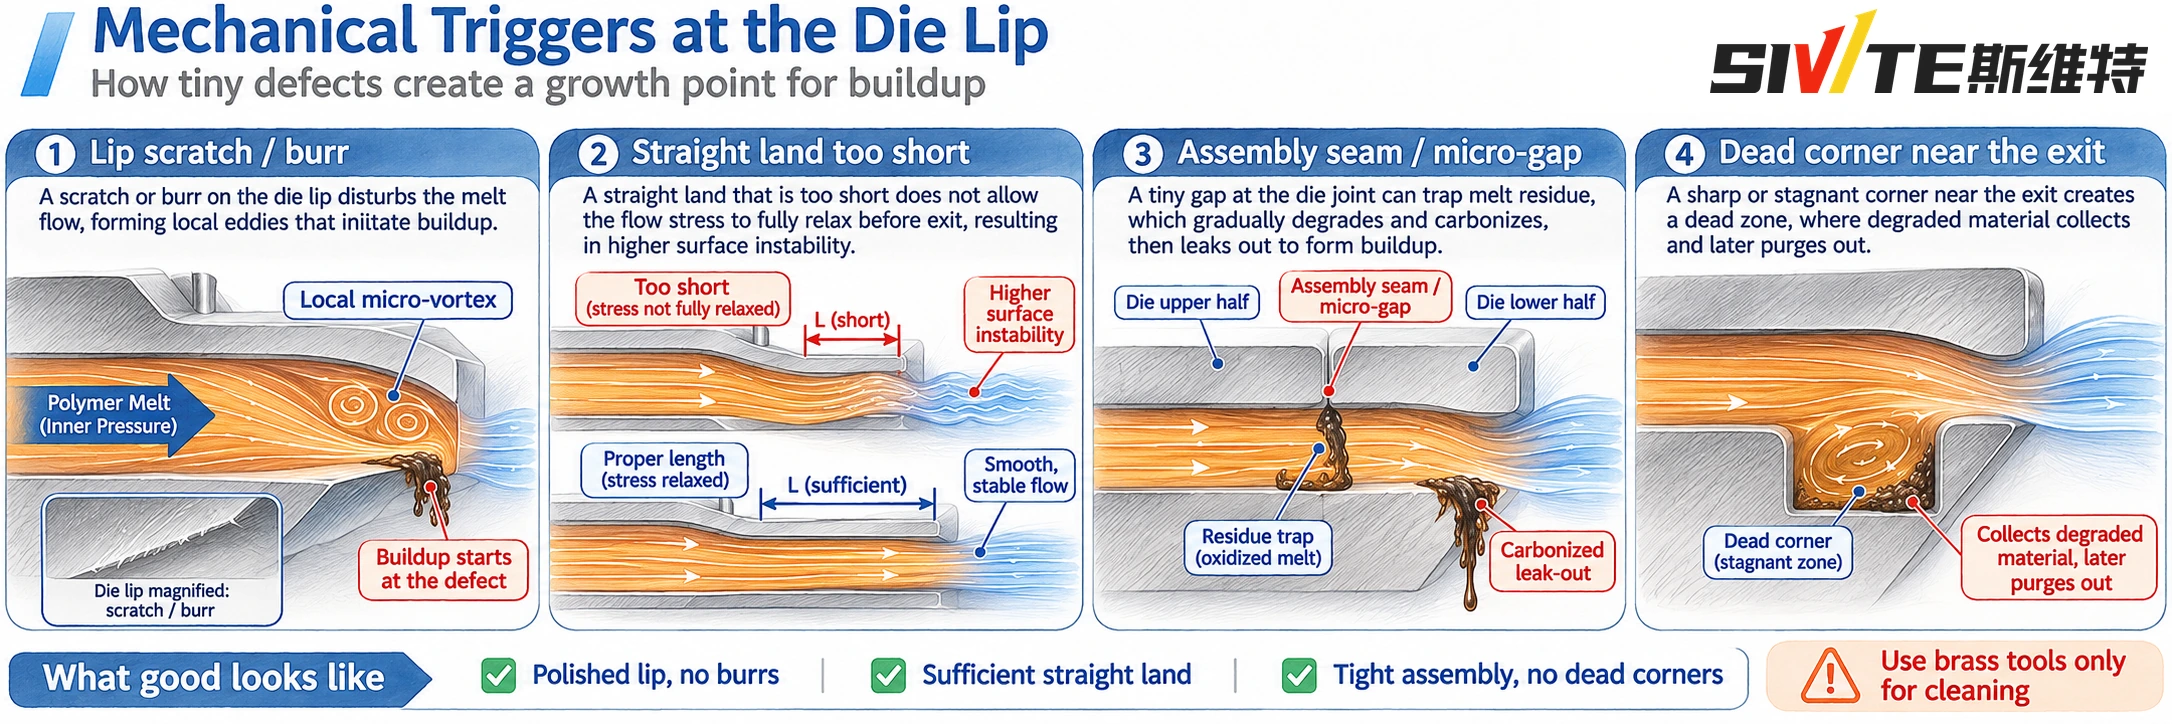
Examples of die-lip scratches, insufficient die land length, assembly gaps, and stagnant flow zones.
Step 2: Check for Excessive External Lubricant
In highly filled formulations, some processors add excessive amounts of external lubricants to improve material flow.
Common examples include:
- Polyethylene wax (PE wax).
- Stearic acid.
These additives have limited compatibility with certain polymer formulations. When their concentration exceeds the compatibility or saturation limit, they may migrate toward the melt surface under high pressure and shear.
As the melt exits the die and pressure drops, the separated lubricant can carry fine filler particles toward the die surface.
Instead of preventing deposits, this sticky surface film can promote further material accumulation.
Review the lubricant dosage, formulation compatibility, and filler loading before making further adjustments.
Step 3: Check Shear Rate and Die Temperature Profile
Excessive screw speed and throughput
Increasing screw speed and production output without considering the die's flow capacity can push wall shear conditions beyond a stable operating range.
The melt surface may become unstable, increasing the likelihood of deposits and surface defects.
An excessively low die temperature
Blindly lowering the die temperature does not always solve die buildup.
When the die temperature is too low, the melt near the wall becomes more viscous. Flow resistance increases, which may also increase wall shear stress and aggravate the problem.
In some cases, a small increase in the final die-zone temperature can improve surface flow and reduce buildup.
The temperature profile should be adjusted according to the actual resin, output, and operating conditions.
Step 4: Review Molecular Weight Distribution and Devolatilization
If die buildup suddenly appears after changing material batches, investigate the raw material first.
Off-grade resin or recycled material may have a broader molecular weight distribution (MWD), potentially containing excessive low-molecular-weight oligomers.
These low-molecular-weight components can migrate more easily toward the die surface.
If the extruder's vacuum venting system does not provide sufficient devolatilization, residual low-molecular-weight substances may remain in the melt and contribute to deposits at the die exit.
Check material consistency, batch differences, and vacuum venting performance.
3. Practical Ways to Reduce Die Buildup
After identifying the likely cause, use the following measures to improve die cleanliness and maintain stable production.
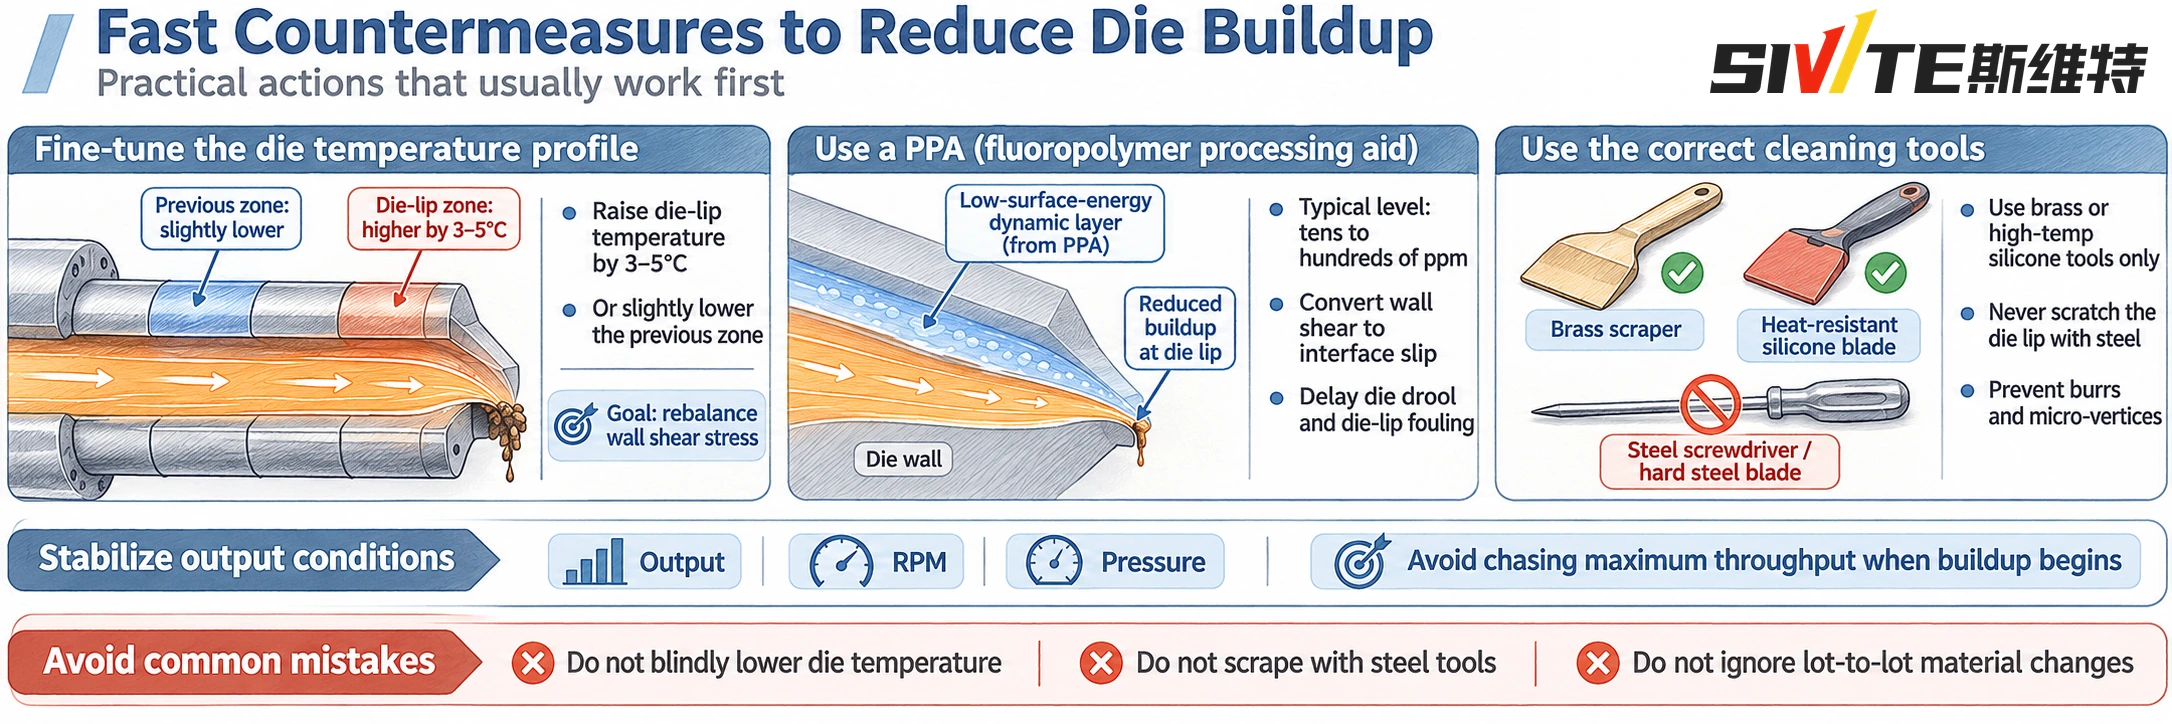
1. Fine-Tune the Die Temperature Profile
If severe thermal degradation is not occurring, try increasing the temperature of the final die zone by approximately 3–5°C.
Alternatively, slightly lower the temperature of the preceding zone to adjust the temperature profile.
The objective is to improve melt flow near the die lip and rebalance wall shear conditions.
Make adjustments gradually and monitor the resulting product quality and deposit formation.
2. Consider a Fluoropolymer Processing Aid (PPA)
A small amount of PPA (polymer processing aid) can help reduce die buildup.
Typical addition levels may range from tens to hundreds of ppm, depending on the resin and formulation.
The processing aid can form a dynamic, low-surface-energy layer on the die wall, helping reduce interfacial resistance and promote slip at the melt–metal interface.
This can significantly delay die drool and die-lip fouling.
3. Use the Correct Cleaning Tools
Avoid using steel screwdrivers, hard steel blades, or other tools that can scratch the die lip.
Even small scratches can become starting points for recurring buildup.
Recommended cleaning tools include:
- Dedicated brass scrapers.
- Heat-resistant silicone blades.
Protecting the die-lip surface is just as important as removing existing deposits.
4. Keep Production Conditions Stable
When buildup begins to appear, avoid blindly increasing screw speed or chasing maximum throughput.
Check output, screw speed, melt pressure, and the die temperature profile together.
Stable operating conditions help reduce unnecessary fluctuations in melt flow and shear.
4. Quick Troubleshooting Checklist
| Observation | Priority check |
|---|---|
| Buildup repeatedly appears in the same location | Die-lip scratches, burrs, seams, or dead zones |
| Buildup increases after a formulation change | Excess lubricant or poor additive compatibility |
| Buildup becomes worse at higher output | Screw speed, throughput, and wall shear |
| Buildup appears after a material batch change | Molecular weight distribution and low-MW components |
| Deposits continue despite cleaning | Die condition, formulation, and devolatilization |
5. Frequently Asked Questions About Extrusion Die Buildup
What is the main cause of die drool?
Die drool usually results from several interacting factors, including polymer degradation, lubricant migration, low-molecular-weight components, excessive shear, and mechanical dead zones around the die lip.
Will lowering the die temperature prevent die buildup?
Not necessarily. An excessively low die temperature can increase melt viscosity and flow resistance, potentially increasing wall shear stress. A controlled 3–5°C increase in the final die zone may help in some cases.
Can PPA eliminate die buildup?
PPA can reduce interfacial resistance and delay die-lip deposits, but it cannot correct mechanical damage, excessive lubricant loading, or poor material quality.
What is the safest way to clean an extrusion die lip?
Use dedicated brass scrapers or heat-resistant silicone cleaning tools. Avoid hard steel tools that can scratch the die surface and create new buildup points.
Why does die buildup appear after changing raw materials?
A new material batch may have a different molecular weight distribution or contain more low-molecular-weight components. Insufficient vacuum venting can further contribute to deposit formation.
Conclusion: Keep the Die Lip Clean by Controlling the Root Causes
Extrusion die buildup is not simply a temperature problem. It is often the result of an imbalance between melt flow, die geometry, formulation, processing conditions, and raw-material quality.
Rather than repeatedly scraping the die lip, follow a systematic troubleshooting process:
- Inspect the die surface and flow path.
- Review lubricant levels and formulation compatibility.
- Check screw speed, throughput, and die temperature.
- Investigate material quality and devolatilization.
By identifying the underlying cause and making controlled adjustments, processors can reduce recurring die deposits, improve product surface quality, and maintain more stable extrusion production.
Need help troubleshooting your extrusion process?
If you are experiencing recurring die buildup, surface defects, or unstable melt flow, contact SWT Extrusion. Share your material type, production output, die temperature profile, and operating conditions so the problem can be evaluated more accurately.
Related reading: Black Specks in Plastic Extrusion: Causes & Solutions