Few quality problems are more frustrating in extrusion, blown film, cast film, or extrusion coating than finding hundreds of raised specks when the finished web is held against the light. These defects are commonly called gels, fish eyes, hard spots, or black specks.
A high gel count can make a roll visually unacceptable. It can also cause film breaks, poor corona treatment, printing defects, lamination bubbles, coating holidays, and reduced mechanical strength. The fastest route to a solution is to identify what the center of the defect is made of before changing process settings.
Most "Crystal Points" Are Not Crystalline Defects
Despite the common shop-floor name, most visible hard specks are not caused by polymer crystallization. They are usually unmelted high-molecular-weight material, poorly dispersed particles, or thermally damaged crosslinked gel.
When the melt passes through the die and is stretched into a thin web, normal material deforms uniformly. A hard inclusion cannot stretch at the same rate, so it pushes up the film surface and forms a transparent, translucent, white, yellow, or black raised spot.
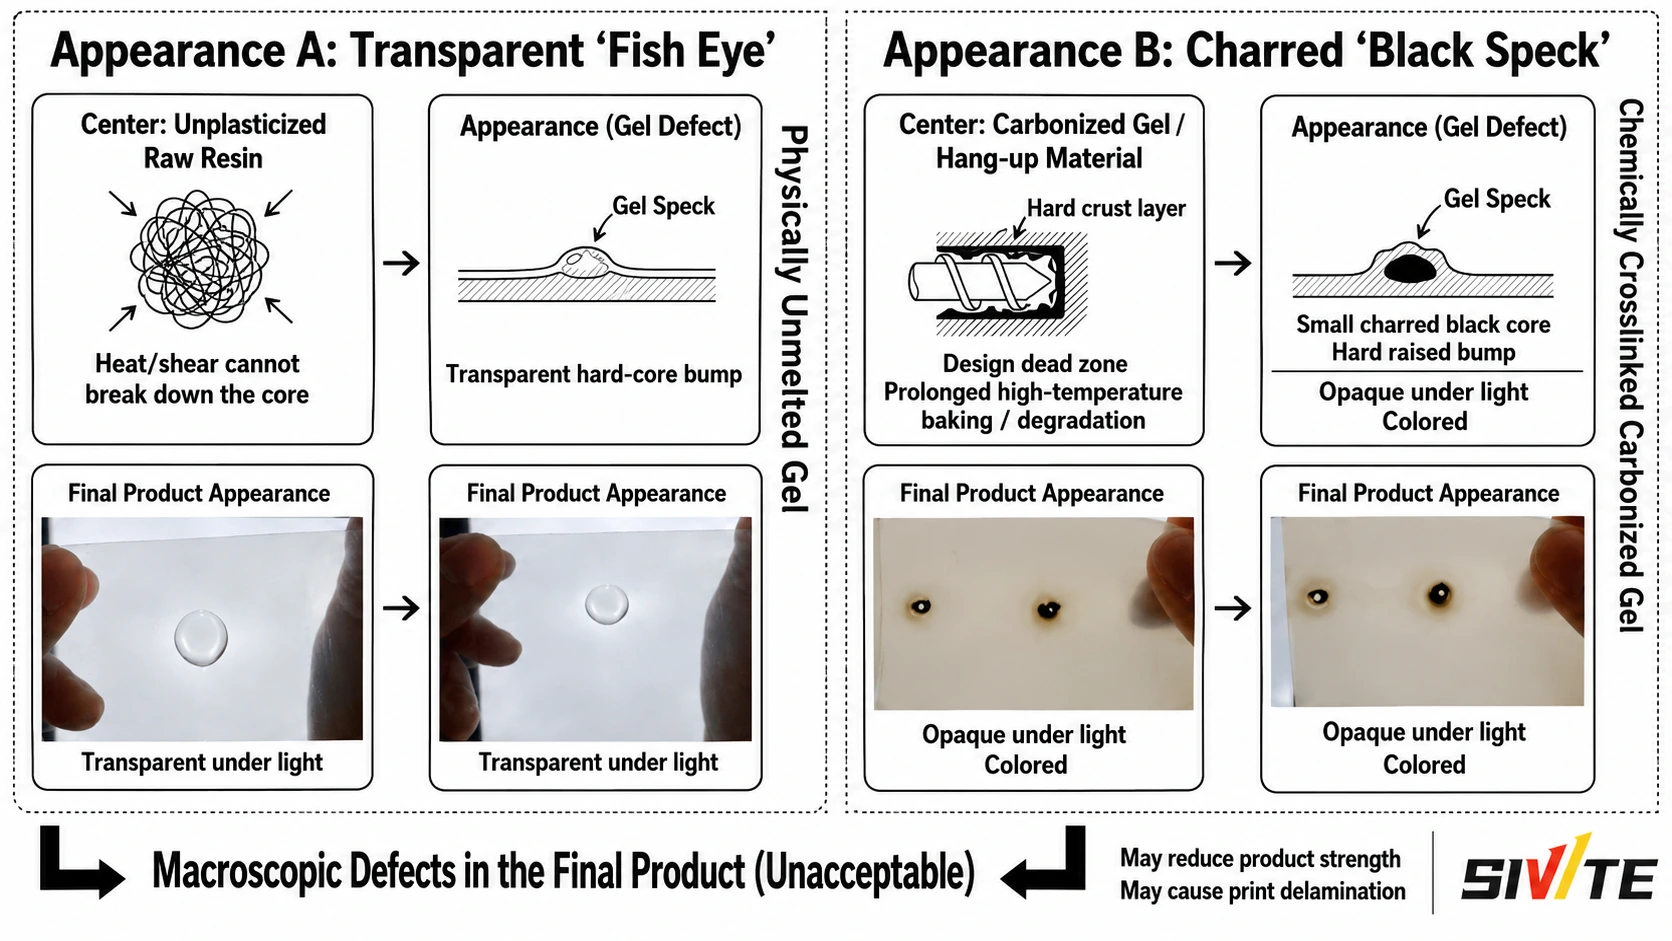
The Two Main Families of Gel Defects
1. Physical Causes
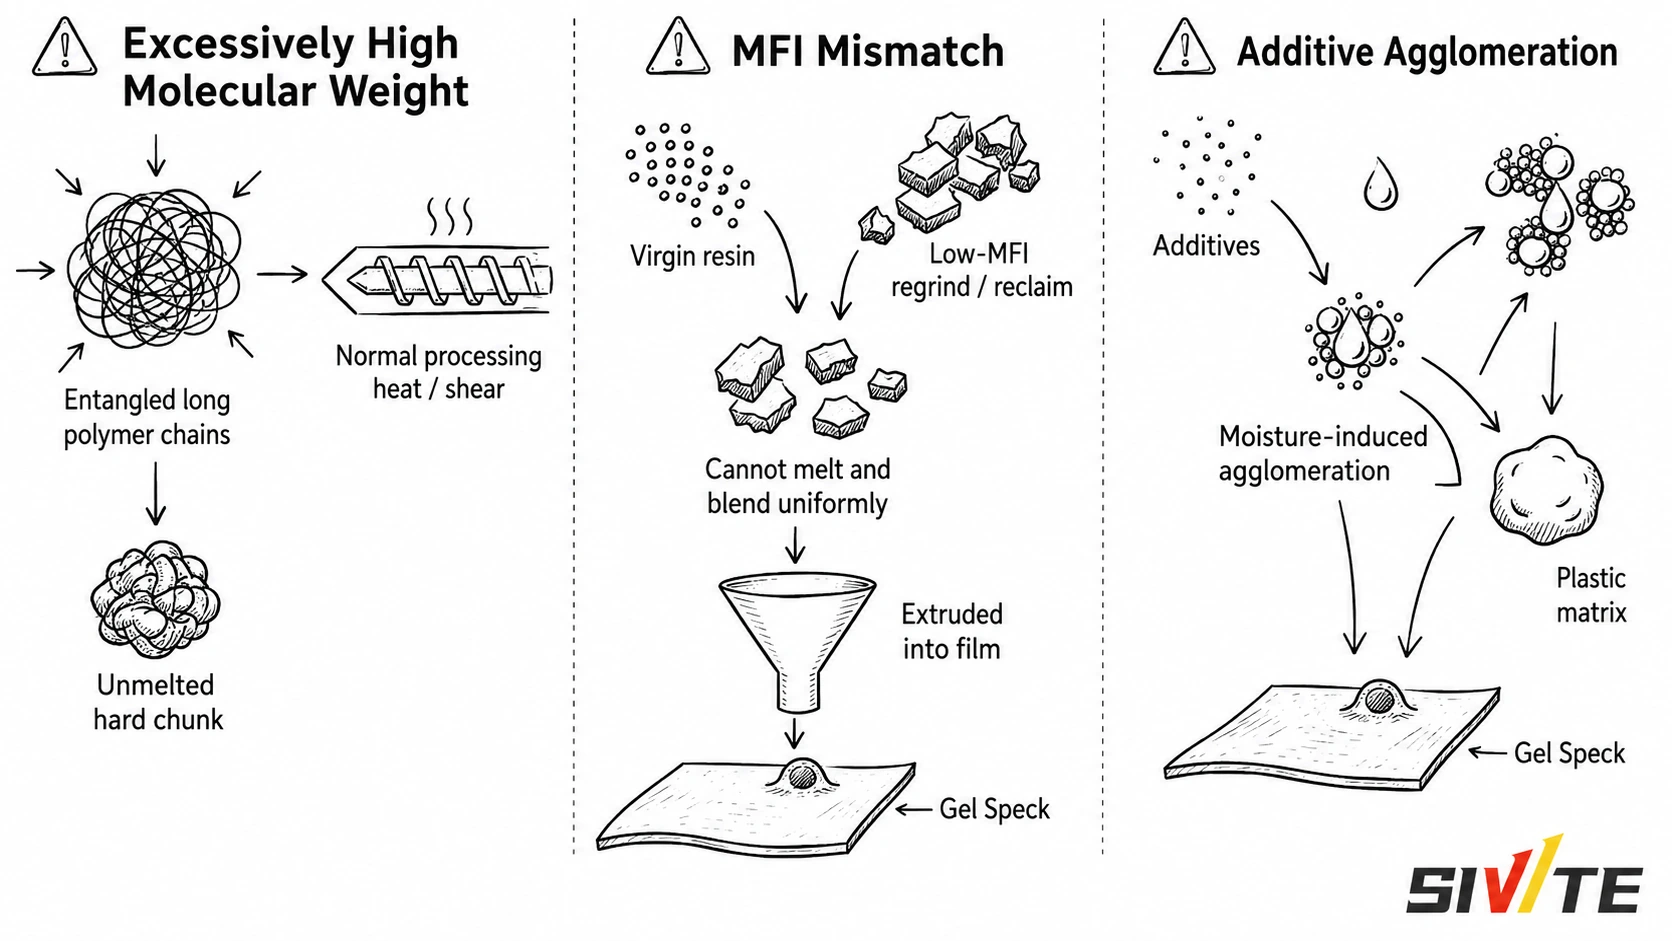
Physical gels are solid inclusions that the available heat, shear, and residence time cannot disperse completely.
Excessively High Molecular Weight
Polymerization is never perfectly uniform. A resin can contain a very small fraction of ultra-high-molecular-weight chains. These long chains become heavily entangled and may not melt or relax under normal processing conditions. The surrounding resin flows, but the high-molecular-weight fraction remains as a transparent hard core.
Severe Melt Flow Index Mismatch
Regrind, recycled material, off-grade resin, or masterbatch with a much lower MFI has a higher melt viscosity than the main resin. When the viscosity difference is too large, the components do not melt, distribute, and deform at the same rate. Small low-MFI fragments can survive extrusion and appear as fish eyes in the final film.
Additive or Filler Agglomeration
Antioxidants, slip agents, antiblock agents, calcium carbonate, talc, silica, and other inorganic particles can agglomerate when mixing is poor or the material absorbs moisture. Once a hard cluster forms, the polymer matrix may not penetrate it fully, leaving a white core or raised speck.
2. Chemical and Equipment-Related Causes
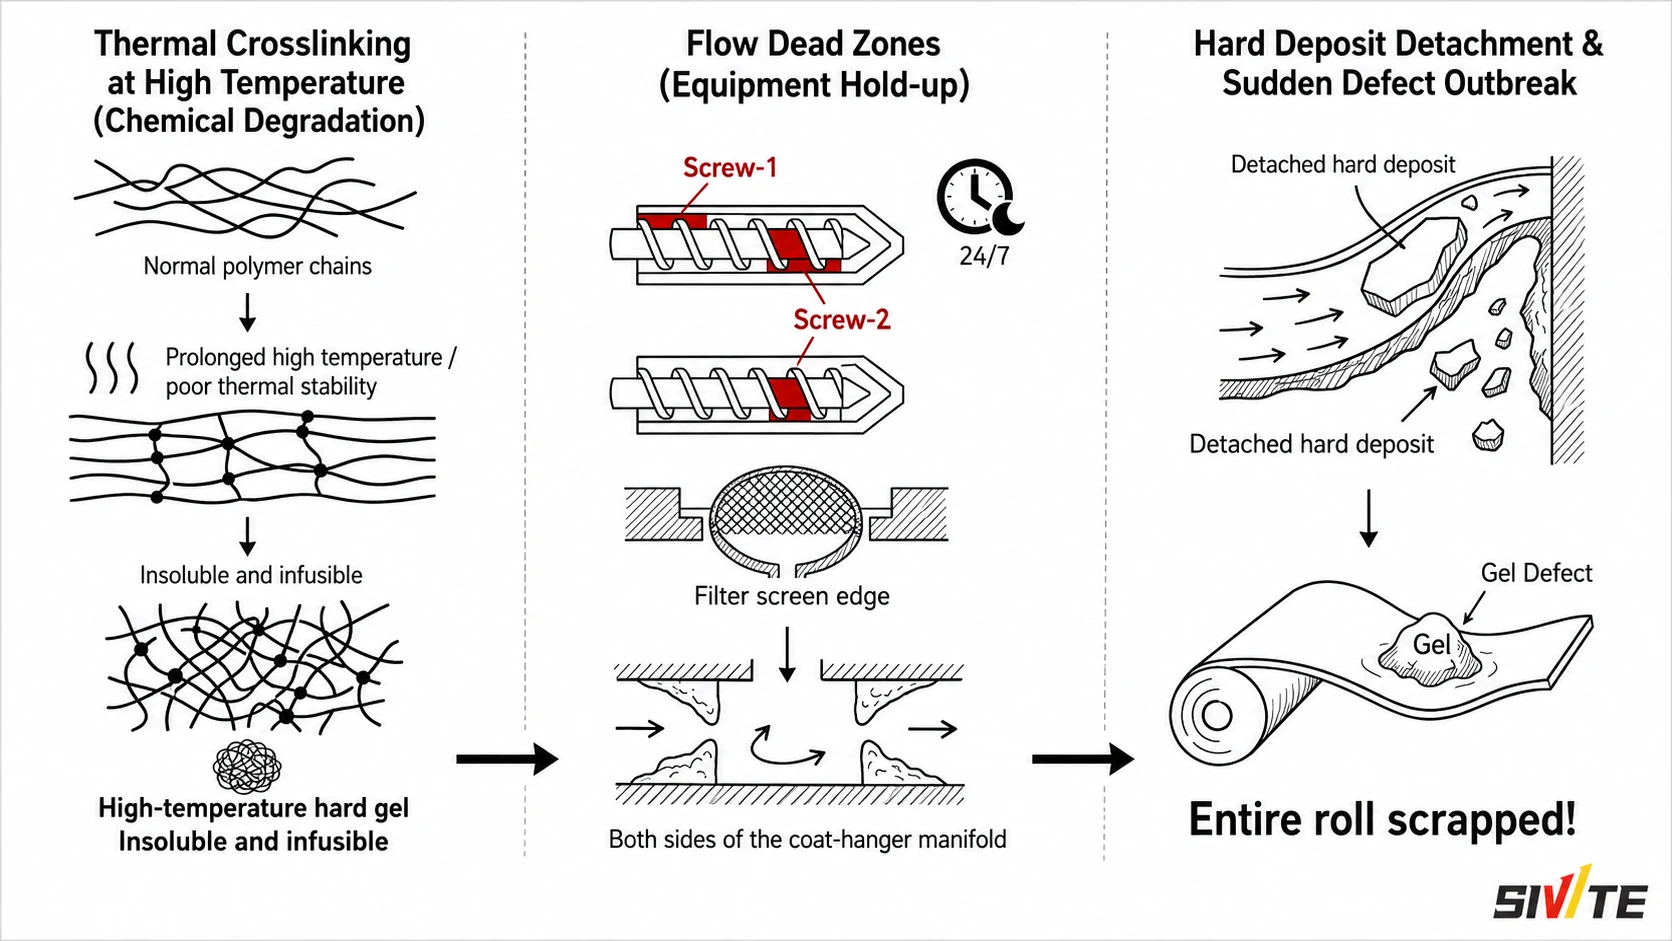
Some polymers do more than undergo chain scission during prolonged exposure to heat. Polyolefins and copolymers with unstable structures can also crosslink. Adjacent molecular chains become chemically connected and form a three-dimensional network that is insoluble and infusible.
The most common locations for this damage are low-flow or stagnant areas, including:
- Screw-root and barrel-wall deposits
- Screen-pack and screen-changer edges
- Steps, gaps, and pockets in adapters
- Both edges of a coat-hanger die manifold
- Poorly heated or overheated die zones
Material trapped in these locations may remain at high temperature for days. It gradually forms a hard skin or carbonized deposit. When the main melt stream finally breaks off part of that deposit, the machine can produce a sudden outbreak of gels or black specks and scrap an entire roll.
A Four-Step Shop-Floor Troubleshooting Method
Do not begin by changing every temperature and speed setting. First collect several representative defects, inspect their centers under strong transmitted light or a magnifier, and follow the sequence below.
Step 1: Identify the Defect by Appearance
- Black or yellow center: Suspect thermal degradation, carbonization, or material released from a dead zone. Check for local overheating, failed heater control, excessive residence time, and internal deposits before blaming the resin.
- Transparent or translucent hard center: Suspect unmelted resin, an ultra-high-molecular-weight fraction, low-MFI contamination, or insufficient plasticization.
- White core or visible particle: Suspect additive or filler agglomeration, poor dispersion, contamination, or moisture-related clumping.
Appearance is not a complete laboratory diagnosis, but it quickly separates process-plasticization problems from equipment-deposit problems.
Step 2: Adjust Heat and Shear Carefully
For transparent unmelted defects, increase the temperature in the relevant late barrel or die zone by approximately 5-10 degrees C and observe the trend. Increase screw speed moderately if the process has enough torque and pressure margin; this can improve distributive and dispersive mixing.
Make one change at a time and record the response. If the defects are yellow or black, increasing temperature may accelerate degradation and make the problem worse. Persistent transparent gels may require a screw configuration with more effective kneading, barrier, or mixing elements rather than a higher temperature setpoint.
Step 3: Filter, Purge, and Inspect the Equipment
Check the screen pack for rupture, bypass, incorrect sealing, or insufficient filtration. A finer or properly layered screen pack can intercept hard particles, but screen changes must remain within the machine's allowable melt-pressure range.
If colored gels continue after a screen change, deposits are probably present upstream or inside the die. Use a purge compound compatible with the processed polymer and follow the equipment and purge-material suppliers' procedures. If purging does not stop the contamination, shut down safely and clean the screw, barrel, adapter, screen changer, and die flow surfaces mechanically.
Inspect especially carefully around transitions, fasteners, manifold edges, damaged chrome surfaces, and poorly controlled heater zones. A small dead pocket can contaminate many rolls.
Step 4: Trace the Raw-Material Source
If cleaning and process adjustments do not eliminate a stable population of transparent gels, compare raw-material lots and suppliers.
- Measure or verify the MFI of virgin resin, regrind, recycled resin, and masterbatch.
- Review the resin's molecular-weight distribution and gel specification with the supplier.
- Confirm that all blend components are compatible at the intended ratio.
- Audit storage, conveying, drying, and mixing for moisture or cross-contamination.
- Isolate regrind and masterbatch additions to determine which stream introduces the defect.
Moisture control is especially important for hydrolysis-sensitive materials such as PLA and PBAT. Inadequate drying can cause rapid viscosity loss, unstable flow, degradation, and charred deposits. Control the dryer dew point, residence time, and incoming moisture content rather than relying only on the dryer temperature display.
Prevention Is More Effective Than Emergency Cleaning
Most gel problems can be prevented through a balanced screw design, adequate mixing without excessive residence time, smooth flow passages without dead zones, compatible raw materials, effective drying, and routine preventive purging.
When gels appear, remember the sequence: inspect the center, classify the defect, adjust one variable, then trace the source. This disciplined method is faster and safer than randomly increasing temperature or replacing every screen pack.
A well-designed screw and die, combined with consistent material control and planned maintenance, can eliminate the majority of recurring gel-defect problems before they reach the finished roll.