A Practical Troubleshooting Guide from Processing Conditions to Formulation
Yellowing is often more than a cosmetic defect. Moisture, excessive melt temperature, shear, residence time, antioxidants, contamination and recycled material can all accelerate polymer degradation.
One of the most frustrating problems in plastics processing is unexpected yellowing.
Sometimes the formulation has not changed. The barrel temperature settings are exactly the same as the process sheet. Yet the extrudate, sheet, pellet or molded part suddenly develops a yellow tint.
Yellowing is not only a cosmetic issue. In many cases, it is a visible warning that the polymer has already begun to experience thermal oxidation, hydrolysis, excessive shear heating or molecular-chain scission.
As degradation progresses, the material may also show:
- Lower molecular weight
- Reduced impact strength
- Lower tensile properties
- Black specks
- Odor
- Melt instability
- Poor surface quality
So how should plastic yellowing be diagnosed systematically? The following eight checkpoints cover the most common causes from both the processing side and the formulation side.
8 Common Causes of Plastic Yellowing
1. Insufficient Drying: Hydrolysis and Moisture-Related Degradation
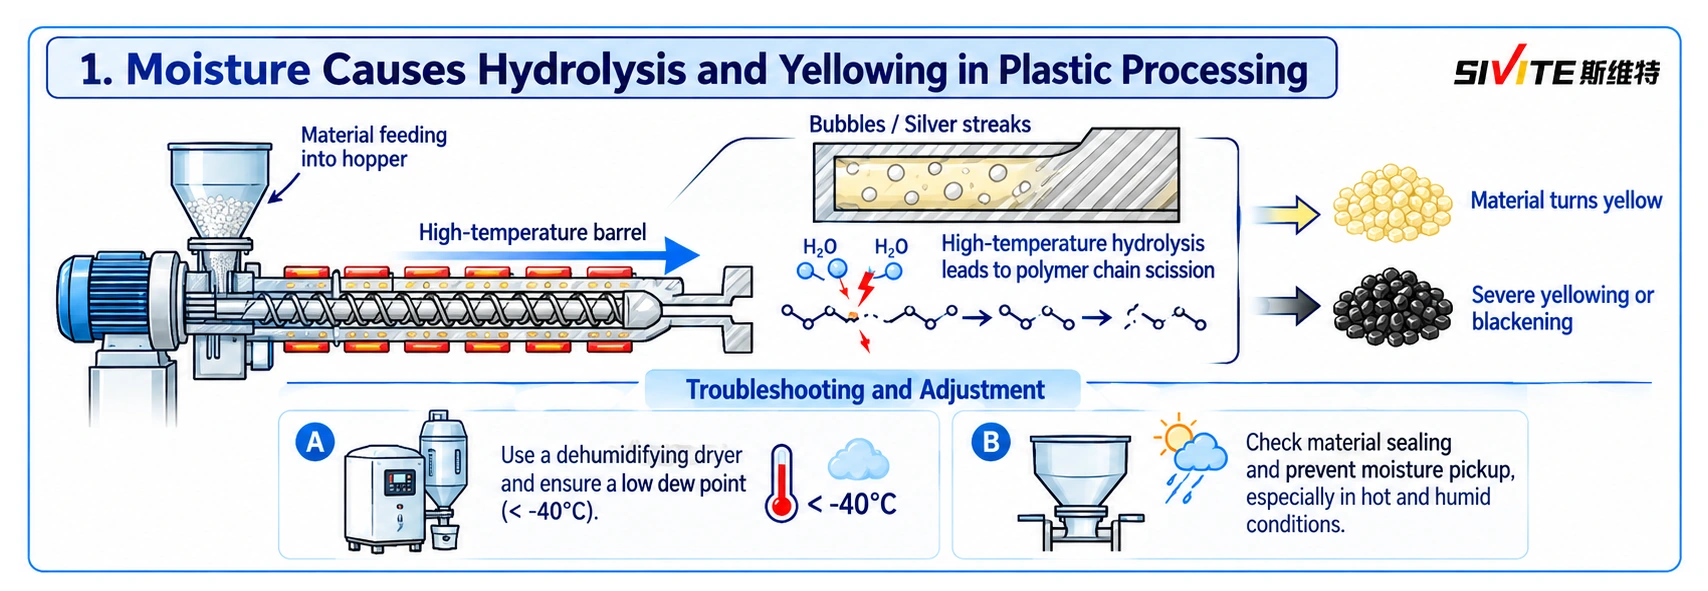
Many engineering polymers are highly sensitive to moisture. This is especially important for PET, PBT, PLA, PC and PA. For hydrolysis-sensitive polymers, even relatively small amounts of residual moisture can become a serious problem at processing temperature.
Typical Symptoms
Poorly dried material may produce:
- Bubbles
- Splay
- Silver streaks
- Reduced viscosity
- Yellowing
- Severe discoloration
- Loss of mechanical properties
At high temperature, moisture can attack susceptible polymer chains and accelerate molecular-weight reduction.
What to Check
Do not look only at the dryer temperature. The dew point of the drying air is often more important.
For many hygroscopic engineering plastics, a properly operating desiccant dryer is typically expected to provide air around -40°C dew point or lower, depending on the resin and process requirements.
Also inspect the material path after drying. Material that has been dried correctly can absorb moisture again during transfer, hopper loading, storage or exposure to humid factory air. This is particularly important in hot and humid production environments.
2. Beware of Shear Heating: Barrel Set Temperature Is Not Melt Temperature
One of the most common troubleshooting mistakes is assuming: “The temperature controller looks normal, so the material temperature must also be normal.” That is not necessarily true.
A polymer receives heat from two major sources:
- External barrel heating
- Mechanical energy generated by screw rotation and shear
At high screw speed, high melt viscosity, high filling level, high torque or intensive kneading, viscous dissipation can generate substantial internal heat. The actual melt temperature can therefore be considerably higher than the barrel set temperature.
Typical Symptoms
Excessive shear heating may cause yellowing, local degradation, black specks, odor, melt instability and reduced mechanical properties.
What to Check
Measure the actual melt temperature near the die or melt outlet instead of relying only on barrel-wall thermocouples.
If actual melt temperature is too high, consider reducing screw speed, reducing excessive kneading intensity, lowering selected barrel-zone temperatures, optimizing screw configuration, and balancing output and shear input.
The correct objective is not simply to lower every temperature zone. The goal is to control the real thermal history of the polymer.
3. Excessive Residence Time: Dead Zones and Melt Stagnation
The longer a polymer remains at elevated temperature, the greater the risk of thermal degradation. This becomes especially serious when machine capacity is much larger than actual production output.
Common Situations
- Large injection molding machine producing very small shot weights
- Extruder running far below normal throughput
- Long production interruptions
- Melt stagnation around screw tips
- Dead zones around check rings
- Poorly designed adapters
- Dead corners in dies or nozzles
Typical Symptoms
Material trapped in these areas may gradually yellow, turn brown, carbonize or produce black specks. The degraded material can then slowly contaminate otherwise good production.
What to Check
Estimate the actual residence time. For injection molding, verify whether machine size and shot size are properly matched.
For extrusion, inspect possible material hold-up areas such as the screw tip, adapter, screen changer, die manifold, flow channels and dead corners. A smooth, streamlined melt path reduces stagnation and excessive thermal history.
4. Screw Configuration Is Too Aggressive: Excessive Shear
This is particularly important in twin screw extrusion. More kneading elements do not automatically mean better mixing. A screw configuration with too many high-shear elements can over-process the polymer.
Typical Causes
- Too many kneading blocks
- Excessive 60° or 90° kneading elements
- Strong restrictive elements
- High-shear elements placed too close together
- Excessive shear close to the vent section
Possible Results
- High melt temperature
- Polymer degradation
- Yellowing
- Additive decomposition
- Poor venting
- Unstable melt quality
What to Adjust
Use the minimum shear intensity required to achieve the desired dispersion, distribution, mixing and filler wetting.
For sensitive fillers or additives, consider side feeding rather than forcing every component through the entire high-shear section from the main hopper. A softer screw configuration can often improve color stability without sacrificing mixing performance.
5. Antioxidant System: Primary and Secondary Antioxidants Must Work Together
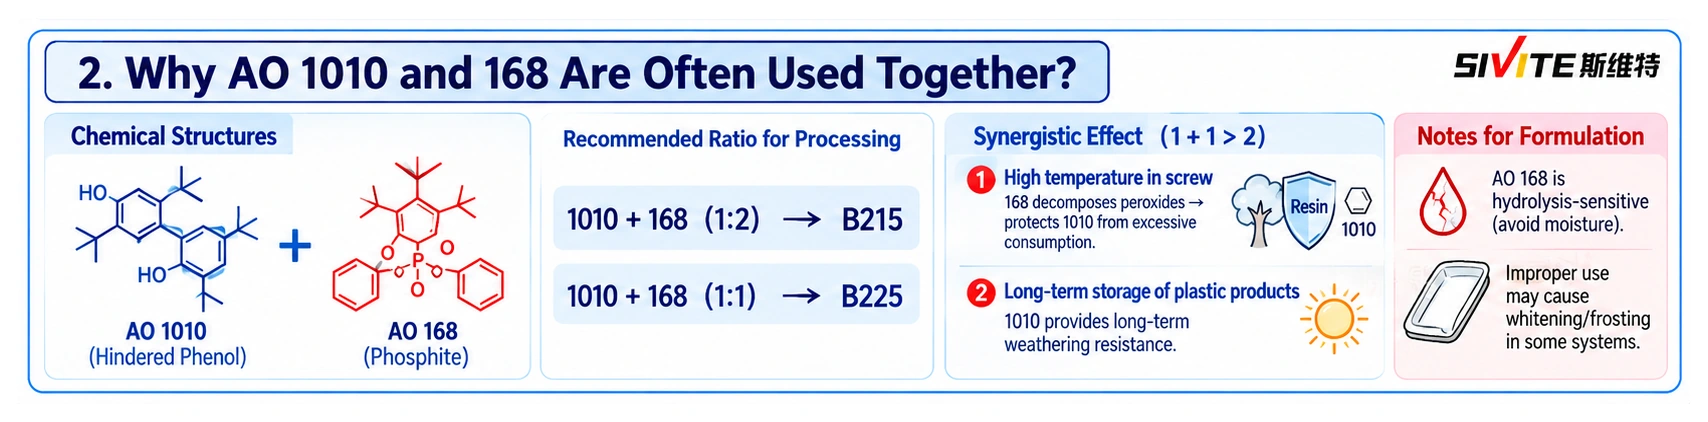
When yellowing originates from thermal oxidation, the antioxidant package becomes one of the most important formulation tools. A typical stabilization system often uses both primary and secondary antioxidants.
Primary Antioxidants
Common examples include hindered phenols such as AO 1010 and AO 1076. Their main role is to capture free radicals and interrupt the oxidation chain reaction.
Secondary Antioxidants
Phosphites such as AO 168 are commonly used to decompose hydroperoxides generated during processing. Secondary antioxidants can be especially important for maintaining color during high-temperature melt processing.
Important Formulation Cautions
More antioxidant is not always better. Excessive hindered-phenol levels, contamination or exposure to certain environments can contribute to phenolic yellowing.
Interactions with NOx, alkaline contaminants, pigments, fillers and other additives may also influence color stability.
For demanding formulations, it may be necessary to evaluate more hydrolytically stable phosphites, higher-molecular-weight stabilizers, and optimized primary/secondary antioxidant combinations.
Ratios such as 1:1 or 1:2 are sometimes used as development starting points, but the final ratio must be validated for the actual polymer, processing temperature, residence time and complete additive package.
6. Trace Contaminants and Metal-Ion Catalysis
Very small amounts of contamination can dramatically accelerate polymer oxidation. Metal ions such as iron, copper and titanium may catalyze degradation reactions in certain polymer systems.
Possible Sources
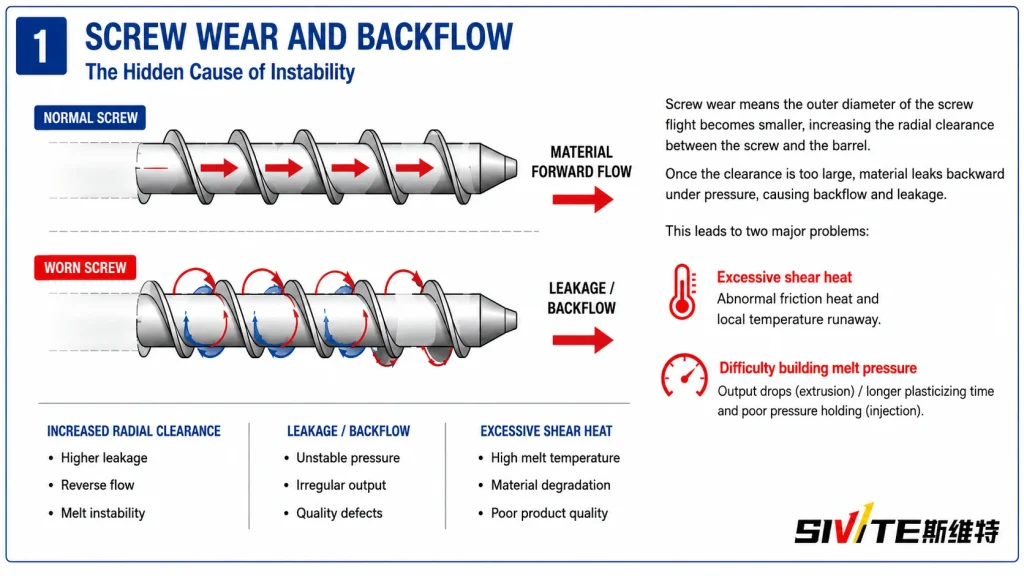
- Screw or barrel wear
- Metallic debris
- Low-purity calcium carbonate
- Talc or mica impurities
- Catalyst residues
- Low-quality process oil or lubricant
- Contaminated recycled material
What to Check
Review the purity and consistency of mineral fillers, surface-treatment agents, lubricants, white oils, pigments and additives.
If yellowing disappears after switching to a higher-purity lubricant or filler grade, the problem may not be the polymer itself. It may be additive- or impurity-driven discoloration. See the related guide to calcium carbonate in plastics.
7. Regrind or Recycled Material Ratio Is Too High
Many factories use sprues, runners, edge trim, crushed scrap and reprocessed pellets to reduce material cost. However, every additional processing cycle adds another thermal history.
Regrind material may already have experienced one or more previous melt-processing cycles. Its remaining thermal stability can therefore be significantly lower than virgin material.
Typical Symptoms
Increasing regrind content may cause yellow color shift, lower viscosity, reduced mechanical properties, more black specks and greater batch-to-batch variation.
What to Check
Control the percentage of regrind consistently. Regrind should also be dried properly when processing hygroscopic polymers.
For systems containing a relatively high percentage of recycled material, additional stabilization may be necessary. In some formulations, processors may evaluate an additional secondary antioxidant dosage around 0.1–0.2%, but this must be validated experimentally and should not be treated as a universal recipe.
8. Shutdown and Purging Procedures
Some yellowing problems actually begin before the current production run starts. Material left inside a hot barrel during the previous shutdown may slowly degrade and carbonize. When production restarts, these degraded residues are gradually carried into the new melt.
Typical Symptoms
- Yellow material during startup
- Black specks during the first production period
- Gradual improvement after extended purging
- Recurring discoloration after every shutdown
Good Shutdown Practice
Do not leave highly degradation-sensitive material inside a hot machine for long periods.
Depending on the polymer and process, an appropriate purging procedure may include reducing barrel temperature, emptying the machine, flushing with a thermally stable resin, using a dedicated purging compound, and cleaning stagnant areas before long shutdowns.
Suitable PP or HDPE grades may be used as purge materials in some applications, provided they are compatible with the machine and the subsequent production material.
9. A Practical Troubleshooting Sequence
When yellowing appears, avoid changing five parameters at once. Start with the easiest variables to verify.
Step 1 — Check Drying
Verify material moisture, dryer dew point, drying time, hopper sealing and moisture pickup after drying.
Step 2 — Check Actual Melt Temperature
Compare set temperature with actual melt temperature. If the melt is significantly hotter, investigate screw speed, torque, shear, screw configuration and output.
Step 3 — Check Residence Time
Look for low throughput, an oversized machine, dead zones and long shutdowns.
Step 4 — Check Screw Configuration
For twin screw extrusion, review kneading-block quantity, kneading angle, restrictive elements and vent-zone configuration.
Step 5 — Check Formulation
Review antioxidants, lubricants, fillers, regrind, metal contamination and additive purity. This sequence helps separate a processing problem from a formulation problem much faster.
Conclusion
Plastic yellowing is rarely caused by only one variable. It is usually the result of the combined effects of moisture, temperature, shear, residence time, screw design, additives, contamination and recycled material history.
Start with the variables that are easiest to verify: drying, actual melt temperature, screw speed and residence time. These often eliminate a large portion of real production problems.
If the polymer still yellows after the processing conditions have been brought under control, then move deeper into antioxidant formulation, lubricant stability, screw configuration and raw-material purity.
The most effective troubleshooting approach is not simply to keep lowering the barrel temperature. It is to understand the complete thermal and mechanical history of the polymer from the hopper to the die.
For related process diagnosis, see screw wear diagnosis, extruder vent overflow troubleshooting, and plastic sheet transverse-line diagnosis. Explore the complete Technical Blog or review SWT’s plastic sheet extrusion line.
Frequently Asked Engineering Questions
Why does plastic turn yellow during extrusion?
Plastic commonly yellows when moisture, excessive melt temperature, long residence time, high shear, contamination or an inadequate stabilization package accelerates polymer degradation.
Can screw speed cause polymer yellowing?
Yes. Higher screw speed can increase viscous shear heating, so the actual melt temperature may rise even when the barrel set temperatures remain unchanged.
How does moisture cause PET or PLA yellowing?
At processing temperature, residual moisture can hydrolyze susceptible polymer chains, reducing molecular weight and contributing to bubbles, silver streaks, viscosity loss and discoloration.
Why are antioxidants 1010 and 168 used together?
AO 1010 interrupts free-radical oxidation, while AO 168 decomposes hydroperoxides formed during processing. Their functions are complementary, but the final ratio must be validated for the complete formulation and process.
Can recycled material cause yellowing?
Yes. Regrind has already experienced at least one thermal history and may have lower remaining stability than virgin resin. Its percentage, moisture and previous processing history should be controlled.